Steve Cushing Impresionist Fine Art Photography
Embracing imperfection, recording emotions, one impression at a time…
- Images-Imperfections
- A.Schacht Ulm 90 f2.8
- A.Schacht Ulm 135 3.5
- ASchacht MTRAVENAR
- Anamorphic LOMO 110
- Asahi Takumar 17 f4
- Berthiot Flor 200 f4.5
- Canon 50 f1.2 RF
- Canon Dream 50 f0,95
- Canon 50 f1.8 Leica
- Canon FD 50 f1.4
- CZ Biogon 35 f2.8
- CZ R-Biotar 50 f0.7
- CZ Biotar 58 f2
- CZ Biotar 58 PreWar
- CZ Biotar 75 f1.5
- CZ Flektogon 20 f2.8
- CZ Pro Tessar 50 f2.8
- CZ Pro Tessar 115 f4
- CZ Sonnar 50 f1.5
- CZ Sonnar 85 f2.0
- CZ Sonnar 135 f4
- CZ Sonnar 135 PreWar
- CZ Stereotar Stereo
- CZ Stereo-System
- CZ Triotar 135 f4
- Cyclop H3T 85 f1.5
- Deltamar 70 f1.6
- EF 100mm f/2.8L USM
- EF 100-400 f/4.5L IS
- El-Nikkor 50 f2.8
- El-Nikkor 50 f4
- Elicar V-HQ Medical
- Ernemann Ernostar f2
- Fujinon 55mm f2.2
- Helios 44 (KMZ)
- Helios 44 58 f2
- Helios 65 50 f2
- ISCO Ultra MC 65 f2
- ISCO Ultra MC 85 f2
- Jupiter 9 85 f2
- Jupiter 11 f4.0
- Kilfitt Makro-Kilar 40
- Konishiroku 35 f2.8
- Konica Hexanon 260
- Leitz Wetzlar AV90 f2.5
- Mayer AV 80 f2.8
- Meyer 100mm f2.8
- Mir-1 37mm f2.8
- MC Rokkor 24mm f2.8
- MC Rokkor 28 mm f2.5
- MC Rokkor 58 f1.2
- MD Rokkor 135 f2.8
- Noflexar 35 f3.5 Macro
- Olympus Zuiko 50 f1.8
- Pentacon 28 f2.8
- Pentacon 50 f1.8
- Pentacon 135 f2.8
- Pentacon 200 f4
- Pentagon AV 80 f2.8
- Pentagon AV 100 f2.8
- Pentacon AV 140 f3.5
- Petzval LOMO 130 f1.8
- Rayxar e50 f0.75 Delft
- Rodenstock Heligon
- Rodenstock Rodagon
- RF 50mm f/1.2L USM
- Rollei Projar 85 f2.8
- Schneider 50 f2.8
- Schneider 75 f4.5
- Schneider 135 f3.5
- Sigma 14-24 DG Art
- Steinheil 135cm f4.5
- Stitz Stereo SV-1 3D
- Stitz Stereo IR SV1 3D
- Super-Takumar 55 f1.8
- Super-Kiptar 90 2.0
- Tair-11 133 f2.8
- Triplet 5 AV 100 f2.8
- Will-Wetzlar AV 90
- French Life
- Aigues-Mortes
- Bardou
- Bédarieux
- Bédarieux Stereo
- Boussagues
- Boussagues Stereo
- Brenas
- Cabreroles
- Caroux Stereo
- Cirque de Mourèze
- Cirque Mourèze Stereo
- Colombieres-sur-Orb
- Colombieres Stereo
- Douch
- Estaussan
- Faugeres
- Faugeres Stereo
- FOS
- FOS Stereo
- Gabion
- Château Grézan
- Gorges d'Heric
- Gorges d'Heric Stereo
- Herepian
- Herepian Stereo
- Herepian Rally
- Herepian Cycling
- Madale de Rosis Stereo
- Minerve
- Minerve Stereo
- Montpellier
- Music Prieuré StJulien
- Olargues
- Olargues Stereo
- Passa Pais
- Passa Pais Stereo
- Pezanas
- Pézènes-les-Mines
- Pézènes Stereo
- Roquebrun
- Saint-Julien
- Saint-Martin-de-l'Arçon
- St-Martin-de-Londres
- St-Martin-de-Londr 3D
- St Guilhem le Desert
- Vieussan
- Vieussan Stereo
- Villemagne-l'Argentaire
- Villemagne Stereo
- Created Imperfections
- IR and UV Selected Range
- Lenses
- Asahi Takumar 17 f4
- A.Schacht Ulm 90 f2.8
- A.Schacht Ulm 135 3.5
- ASchacht MTRAVENAR
- Anamorphic LOMO 110
- Berthiot Flor 200 f4.5
- Canon 50 f1.2 RF
- Canon Dream 50 f0.95
- Canon 50 F1.8 Leica
- Canon FD 50 f1.4
- CZ Biogon 35 f2.8
- CZ R-Biotar 50 f0.7
- CZ Biotar 58 f2
- CZ Biotar 58 PreWar
- CZ Biotar 75 f1.5
- CZ Contaflex
- CZ Flektogon 20 f4
- CZ Flektogon 20 f2.8
- CZ Sonnar 50 f1.5
- CZ Sonnar 85 PreWar
- CZ Sonnar 135 f4.0
- CZ Sonnar 135 PreWar
- CZ Stereotar Stereo
- CZ Stereo-System
- CZ Triotar 135 f4.0
- Cyclop H3T 85 f1.5
- Deltamar 70 f1.6
- EF 100mm f/2.8L
- EF 100-400 f/4.5L IS
- El-Nikkor 50mm
- Elicar V-HQ Medical
- Ernemann Ernostar f2
- Fujinon 55mm f2.2
- Helios 44 (KMZ)
- Helios 44-2 58 f2
- Helios 65 50 f2
- ISCO Ultra MC 65 f2
- Jupiter 9 85 f2.0
- Jupiter 11 135 f4.0
- Kilfitt Makro-Kilar 40
- Konishiroku 35 f2.8
- Konica Hexanon 260
- Leitz Wetzlar 90 f2.5
- MC Rokkor 24 f2.8
- MC Rokkor 28 f2.5
- MC Rokkor 58 f1.2
- MD Rokkor 135 f2.8
- Meyer AV 80mm f2.8
- Meyer 100mm f2.8
- Mir-1 37mm f2.8
- Noflexar 35 f3.5 Macro
- Olympus Zuiko 50 f1.8
- Pentacon 28 f2.8
- Pentacon 50 f1.8
- Pentacon 135 f2.8
- Pentacon 200 f/4
- Pentacon AV 80 f2.8
- Pentacon AV 100 f2.8
- Pentacon AV 140 f3.5
- Petzval LOMO 130 f1.8
- Rayxar e50 f0.75 Delft
- Rodenstock Heligon
- Rodenstock Rodagon
- RF 50mm f/1.2L USM
- Rollei Projar 85 f2.8
- Schneider 50 f2.8
- Schneider 75 f4.5
- Schneider 135 f3.5
- Sigma 14-24 DG Art
- Steinheil 135cm f4.5
- Stitz Stereo SV-1 3D
- Super-Kiptar 90 2.0
- Super-Takumar 55 f1.8
- Tair-11 133 f2.8
- Triplet 5 AV 100 f2.8
- Will-Wetzlar AV 90
- Tech Blog
- Aberrations
- Anaglyph 3D
- Anamorphic Lenses
- Aperture
- Aperture and Lens Size
- Exposure
- Bokeh
- Cha-Cha Stereo
- Chromatic Errors
- Creating Adapters
- Creative Techniques
- Crop Factor
- Dating Lenses
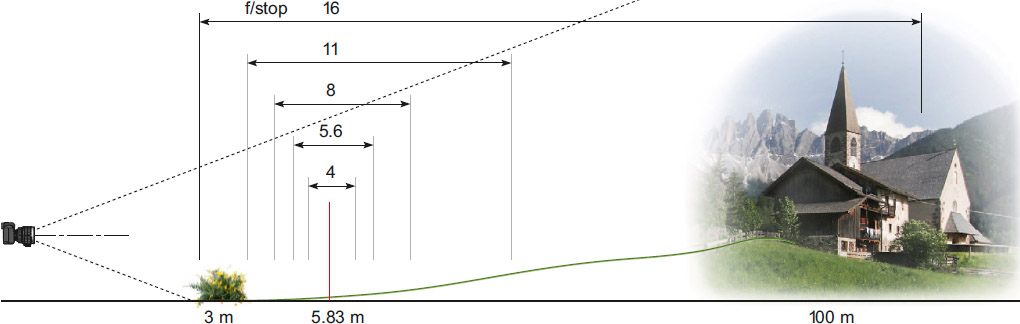
- Depth of Field
- Digital Sensors
- Extension Tubes
- False Colour
- Fast Lenses
- Film VS Digital
- Fine Art Photography
- Flange Distance
- Flange Distances (list)
- Focal Length
- Focal Plane
- Focus Stacking
- Helicoids
- High Dynamic Range
- How Lenses Work
- Hyper Stereo
- InfraRed Photography
- Influencies Art
- Influencies Photos
- ISO Speed
- Lens Cleaning
- Lens Design and Glass
- Lens Design History
- Lens Flare
- Light and Photography
- Manual Lenses
- Maximum Aperture
- ND Filters
- Optical Lens Types
- Painting Photographs
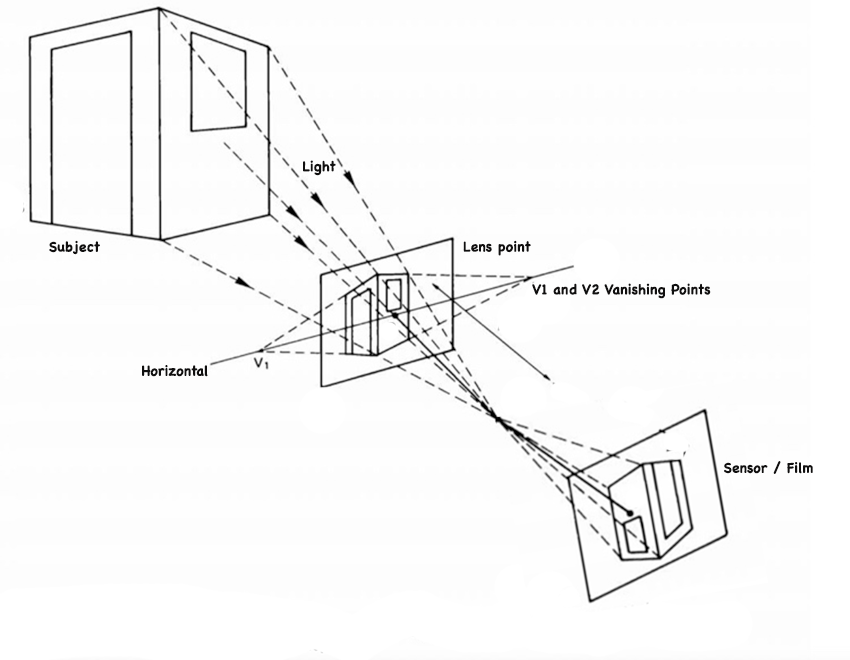
- Perspective
- Projector Lenses
- Radioactive Lenses
- Resolution MTF
- Shutter Speed
- Stereo Photography
- Stereo IR Photography
- Stereo Window
- Tilt and Shift Lenses
- UV Photography
- Vignetting
- Visual Language
- Wet Plate
- Zoom Lenses
- Contact
- Cushing Tree