Steve Cushing Impresionist Fine Art Photography

Steve Cushing Impresionist Fine Art Photography

Embracing imperfection, recording emotions, one impression at a time…

Light


Please also see the section on
Exposure

A photograph is the image of a the pattern of light recorded on film or a sensor. The nature of light has a critical effect on the pictures we make. Few photographers actually understand much about light, but they are not alone, even scientists have never been able to agree fully about the nature of light. The answer to the question is light a wave or a particle is yes!

The word photography actually means writing or drawing with light. Without light there could be no vision or photography because it is reflected light from objects in the world around us that makes these objects visible to both our eyes and the sensor of the camera. Turn of the lights and we see nothing.

Light is a form of electromagnetic radiant energy to which our eyes are sensitive. Unless light is reflected or focused, it travels or radiates in all directions from the source like a cone, in other words as light travels from the source, its energy of light spreads out. The greater the distance it travels, the more it spreads out. Therefore, the amount of light reaching any given area at a given distance is less than that reaching the same area closer to the source. In other words, the intensity of illumination on a surface varies when the distance between the light source and the surface, or subject, is changed.

Light travels at tremendous speed from its source, such as the sun. It has an effect on the materials it falls on, skin becomes tanned, and fruit is ripened by the light of the sun. Depending on the way in which light is received or rejected, a complex pattern of light, shade, and colour results.

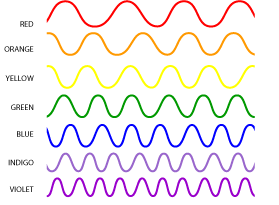
The wavelengths of light are so small that they are measured in nanometers (nm). A nanometer is equal to one millionth of a millimetre.

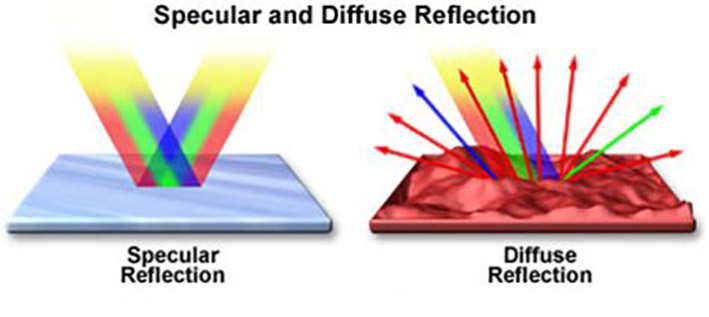
Light slows as it passes through any transparent medium because it actually doesn't just pass through. It is absorbed by atoms and re-emitted all along the way. There is a small lag between the absorption and re-emission of a photon which differs depending on the composition of the material. The thickness of a material also has an effect in that thicker material provides more opportunities for a photon to be absorbed and retransmitted while it's traversing the material.

The aperture size also has a mathematical correlation to how much the speed of light is slowed down. For example, when light goes through your house window glass, it’s speed slows down 300.000km per hour. That is why different glass makes a difference, some of them will reduce the speed way less. Lens design is a very complex process as materials, thickness, space between elements, aperture and not forgetting that colour is a range of different wavelengths all that act differently.

To the photographer, there are two important characteristics of the way light travels.

  • First, in a given medium, light always travels in a straight line.
  • Second, in a given medium, it travels at a constant speed.


Colour of Light

Look at a bright, red apple on a green tree. It is hard to believe that colour is not an inherent property of these objects. Colour is not even inherent to light. What you are seeing is a visual perception stimulated by light. The apple and tree are only visible because they reflect light from the sun, and the apple appears red and the tree appears green because they reflect certain wavelengths of light more than others. When we see a colour, we are simply seeing light of a specific wavelength.

Stacks Image 5


Stacks Image 21

When light is reflected, it acts in a certain way. When the reflecting surface is smooth and polished, the reflection is orderly, or specular. Specular light is reflected at the same angle to the surface as the light incident to the surface; that is, the path of the light reflected from the surface forms an angle exactly equal to the one formed by its path in reaching the surface. Thus the angle of reflection is equal to the angle of However, when the object surface is not smooth and polished but irregular, light is reflected irregularly or diffused, that is, the light is reflected in more than one direction.


Diffused light is more common than specular light, so it is of greatest value in photography.


Stacks Image 15


Diffused light is a soft light without glare of direct light. It is scattered and comes from all directions. Thus, it seems to wrap around objects. It is softer and does not cast harsh shadows.

What Causes Light Diffusion?

When a light beam strikes a smooth surface, most of it reflects back in the same concentration. This is specular reflection, which gives us direct, bright light. A mirror is a common example of a smooth surface that causes specular reflection. On rough surfaces, and even microscopic irregularities in an object create roughness. This does not break the law of reflection. Each ray reflects back at the same angle at which it struck the object but in a different direction. So diffuse light is scattered light. This scattering is what causes the diffusion and softness of the light beam. Light also reflects of one object onto another, so light scattering and reflection is a vital aspect to understand.

All particles scatter light, this is a fundamental fact and something we all encounter on a daily basis, the sky is blue. This is caused by stronger light scattering of blue light by atmospheric particles than red light. The surface finish be it glossy or matt is caused by the particles in the surface.

Types of lighting in Photography

Flat Light

Flat lighting is when you have the light source facing directly onto the front of your subject. It is also sometimes referred to as front lighting.

Flat lighting on a subject will mean that your subject is well lit and you are unable to see any shadows. Since the light is not at an angle, this can result in a limited amount of shadows. The light will be spread evenly across the photo, with no section more or less exposed than the rest. If you’re photographing a person, it will mean that their face is well lit, and that you won’t see any shadows on their face.

Shadows tend to draw out imperfections, and so, this is a great technique to use if your subject has acne, other blemishes or wrinkles. It’s not normally preferred as a lighting technique for portraiture photography since shadows bring the face to life, but with a subject who is self-conscious of their skin imperfections, this would be the way to go.

Broad Light

With broad light (a type of side lighting), the face of your subject is at an angle and the most well-lit side of the face is closest to the camera and the shadow falls on the back side of the face.

If you are considering taking a photograph of a subject’s face, this type of lighting can work well for a person with a narrow face since it makes the face look fuller. It would be less desirable, however, if the subject already has a full face.

Short Light

Another type of side lighting, short light is the opposite of broad light in that the face is at an angle and the shadow falls on the side of the face closest to the camera. This type of light works well to thin a face and is flattering on most people.

One thing to keep in mind is that shadows draw out textures and imperfections. While broad light is a wonderful way to emphasise freckles, it will also draw out imperfections like acne and scars.

Split Light

Split lighting is another type of side lighting but it is defined as light that hits your subject from the side at a 90 degree angle.

Split lighting creates a split of light and shadow half of your subject will be in the light and half will be in the shadow. This technique tends to create more dramatic images. It often makes your subject appear tough and more masculine. This type of lighting also tends to emphasise the texture of the skin and the details of the face. It gives a sense of assertiveness and can also be used to emphasise glamour.

You can easily recognise split lighting in an image by half of the subject being lit and the other half in the shadows. With a face specifically, you’ll see the shadow line straight down the middle of the forehead, nose, and chin.

Soft Light

Soft light is light where shadow edges are soft and open, and there is less contrast. It is achieved with a larger, broader light placed closer to the subject. Overcast days are a great opportunity for outdoor soft lighting.

This type of lighting can be achieved by diffusing your artificial light. This can be achieved in the studio by using a full diffusion panel or soft-box that is placed between the light source and the subject. Window lighting can also be a great source for softer light.

Soft light is used mostly for portraiture, macro, and nature photography. It can also be used to make a subject appear more youthful.

Hard Light

Hard light is the opposite of soft light–it creates strong shadows and high contrast. It creates more dramatic and edgier images. In the studio, you can position the light source where you would with soft light, but you don’t use diffusers to soften the light.

Backlight and Silhouette

Backlight is just that, light that comes from behind your subject. This is commonly seen in photos from the golden hour, when the sun is low in the horizon and starting to set, but can be done at all hours of the day.

Backlighting can be used to create silhouettes, or you can combine it with certain atmospheric conditions–like fog–to get more dramatic images.

One of the problems with this lighting technique is that you can lose clarity in your subject because it is backlit. For that reason, it might help to use reflectors to reflect some of the light back onto your subject (if you don’t want a silhouette), or you can use a technique called the semi-silhouette where you only allow the light to just barely enter the frame. That creates a nice glow that is a welcome contrast to the dark background.

Semi Silhouet

One of my favourite ways to use backlight is to let the light just barely creep into the frame. When doing this, there’s a pretty glow that creates a welcome contrast to a dark background. In this situation, I often expose my subject darker than usual to further that contrast and create a warm and relaxing feel to an image.

Reflector

Sometimes I want the strong haze that comes with the sun warmly filling the frame but losing clarity in my subject’s face is no good. To combat the loss of clarity I use a reflector to reflect some of that sunlight back onto my subject.

When using a reflector, place it opposite the light source and then adjust the angle to direct the light exactly where you want it. You’ll also want to move the reflector closer to your subject for stronger light and further away from for softer light.

Off Camera Flash

Similar to a reflector, off camera flash combats the lack of clarity that comes with lots of backlight. Off camera flash is used just the same as a reflector, to light the face. I do not like on-camera flash as it often creates flat light images.

While a reflector is cheaper and easier to carry around, off camera flash has more powered does not encourage squinting (very important to consider if your subject is extra sensitive to light).

Rim Light

Rim light falls under the backlight category but deserves a spot of its own. With backlight you often see the hazy or airiness from the light in the background resulting in highlights but you don’t have that with rim light.

With rim light, you’ll see the light from behind only highlight the edges of your subject (there’s a little haze falling into the top right of the frame below but you can see how the rim light separates the subject from the background). This is great to use when you need to separate your subject from the background.

Butterfly Light

With butterfly light, the light is placed above and in front of your subject to create a small shadow under the nose resembling a butterfly (hence the name). This type of light beautifully highlights prominent cheekbones which is why you most often see it used on women.

However, it emphasises the shadows from deep set eyes. Again, know your subject’s face and how the light will affect their features. Butterfly light is also commonly referenced as paramount light.

Loop Light

Loop lighting is pretty much my go-to when creating light. With loop lighting, the light is about 45 degrees to the side and slightly above eye level.

This position of the light creates a shadow just under and to the side of one nostril and the nose. This is a flattering type of light on most everyone. It is less dramatic than other lighting types, but it creates more depth than flat lighting. It does all of this by still keeping the subject well-lit.

Loop lighting creates a loop-shaped image under the nose

You can vary the light’s intensity by moving it closer to or further away from your subject. And, you can vary the shape of the shadow by raising or lowering your light source.

Ambient Light

Ambient light is defined as lighting that is not added to the scene by the photographer. Sunlight can be ambient lighting, but so can a streetlight, and don’t forget about moonlight. None of these are added to the scene by a photographer.

Flat Lighting

It also works well if your subject is oozing with character. In that case, flat lighting will allow the natural appeal to shine through. To set up, you simply place your light in front of and slightly above your subject’s face. You can angle it until it lies ‘flat’ on the face.

Rembrandt Lighting

This style of lighting is named after the way that Rembrandt used light in his portrait paintings. It is a type of side lighting, similar to split lighting, except that the side of the face that is in shadow has a triangle of light under the eye. This can be highly effective in making a two-dimensional image appear three dimensional.

Summary and Personal Use

I was always told that taking photographs in the midday sun was not advisable due to the shadows. That it was better to wait until the light was more defused.

But as I take creative art images the reflected sun of leaves creates wonderful bokeh and the midday just offers a different set of effects due to the suns position as does the shadows as they create dark and light areas in the images.

Personally I try to use natural light whenever I can. I also use a foldable reflector/defuser screen quite often as reflected light of objects does not always reflect the light where I want it to be. For me collapsible reflector/defuser is one of the most useful lighting accessories for photography


Site Search


Stacks Image 39

Steve Cushing Photography